- Support Home
- JuiceboxBuilder
- Juicebox Plugins
- Creating Galleries
- Configuration Options
- Button Bar
- Embedding Guide
- » Embedding in a HTML Page
- » Using an External Gallery Folder
- » Using an External jbcore Folder
- » Embedding Multiple Galleries
- » Embedding Using Dreamweaver
- » Embedding in a Joomla Site
- » Embedding in a Drupal Site
- » Embedding in a Web Template Site
- » Embedding with iWeb
- » Embedding with Adobe Muse
- » Troubleshooting Pathing Problems
- » Expand Gallery Behavior
- Frequently Asked Questions
- Upgrading Juicebox
- Version History
- Sharing, SEO and Shopping Cart
- Multi-Size Image Support
- Password Protection
- Theming Guide
- Using the API
Theming Overview
Theming allows you to customize Juicebox's visual appearance. This includes modifying fonts, colors, layout, button icons and preloaders.
Basic theming can be achieved via the color config options. More advanced theming can be achieved by using custom icons or by creating a custom theme.
Please note that advanced theming requires knowledge of CSS.
Creating a Custom Theme
Many gallery style options can be controlled by the config options, including colors and layout. Gallery CSS can also be modified by adding CSS styling directly in the gallery page HTML.
For complete control over gallery appearance, you can create a custom theme. A theme is comprised of CSS files and icon font files. You can edit these files in the same way as any other CSS files.
View the Juicebox custom theme demo.
To create a new custom theme, do the following:
- Copy the
web/jbcore/classicfolder. Rename it to your new theme name. This is your theme folder. - In the gallery embed code, set the
themeURLoption to point to the new theme CSS file. - Edit the CSS files in the theme folder to create your own theme.
Using Custom Fonts
You can specify the font used by Juicebox with the galleryFontFace config option. The browser will try to use the fonts in the order in which they are listed. Fonts must be installed on the viewing device to be displayed.
To use Google's free web fonts with Juicebox, use the standard method to embed a Google font in a webpage. Once the font is working in the webpage, set the galleryFontFace option to be the same as the Google font name. See an example here.
Using a Custom Preloader
To use a custom preloader graphic, first you need to create a custom theme as described above.
Next, replace the img/spinner.gif file in the theme folder. You can get lots of free preloader gifs at preloaders.net
Using Custom Icons
Juicebox uses vector icon fonts for button icons. This ensures sharp, good looking icons at any icon size and screen density, including 'retina' displays. View a demo using custom icons.
To modify the icons that Juicebox uses, you need to create a new Icon Font. There are multiple ways to do this but we recommend using the free IcoMoon web app.
To use IcoMoon to create a customized Juicebox icon font, do the following:
- Copy the
web/jbcore/classic/fonts/juicebox.svgfile from the Juicebox download folder to your desktop. - Go to IcoMoon and click 'IcoMoon App' to launch the IcoMoon Font editor app.
- Click 'Import Icons' and select the
juicebox.svgfile from step 1. Click 'yes' for the 'Use this font's metrics?' dialog. - You will see the 'juicebox' icon set appear at the top of the icon list. Use the Pencil button to edit and replace icons. Note that Juicebox icons use a 20px grid.
- Once you have modified your icons, select them and click 'Generate Font' at the bottom of the app. You will now see your selected icons displayed with their associated Unicode Ids (e.g. 'e000'). There should be 24 glyphs.
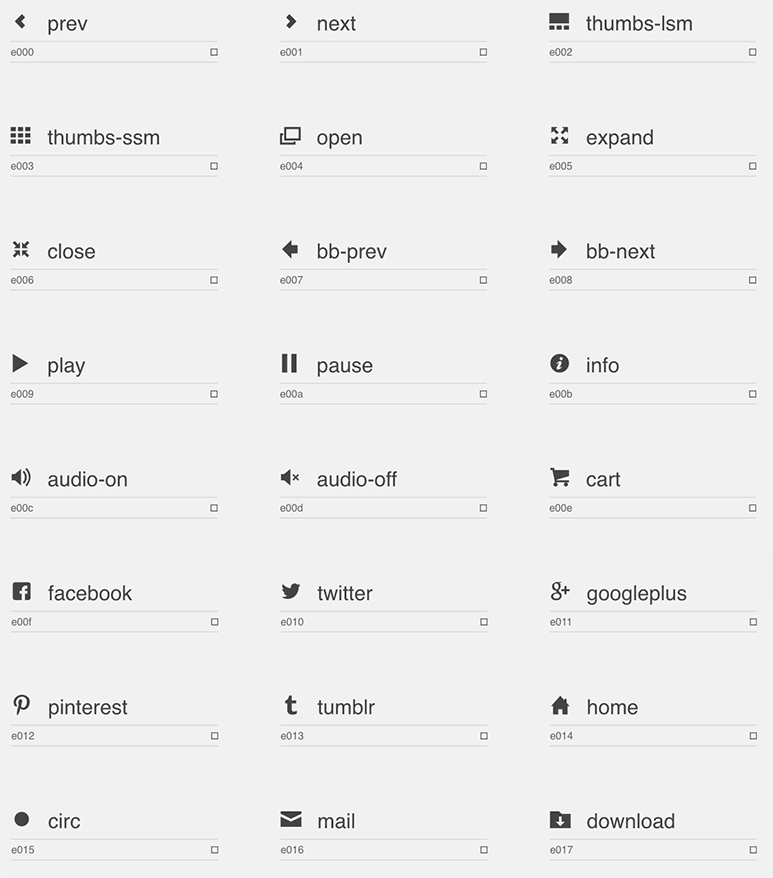
- To replace Juicebox icons with other icons from the IcoMoon library, the new icon must have the same Unicode Id as the icon it is replacing. To replace an icon, first unselect the icon you are replacing, then select the new icon. After clicking 'Generate Font' you need to set the Unicode id of the new icon to match the old id, by editing the Unicode id text below the icon image. See the image below for the Unicode characters associated with each icon.
- On 'Generate Font’ page, click the cog icon at bottom right and change 'Font Name’ from 'icomoon’ to 'juicebox’.
- Click 'Download' to download your new Icon Font.
- Replace the
jbcore/classic/fonts/folder in your gallery folder with the downloaded 'juicebox/fonts' folder. This folder contains 4 font files. - View your gallery to see the new icons.

