- Support Home
- JuiceboxBuilder
- Juicebox Plugins
- Creating Galleries
- Configuration Options
- Button Bar
- Embedding Guide
- » Embedding in a HTML Page
- » Using an External Gallery Folder
- » Using an External jbcore Folder
- » Embedding Multiple Galleries
- » Embedding Using Dreamweaver
- » Embedding in a Joomla Site
- » Embedding in a Drupal Site
- » Embedding in a Web Template Site
- » Embedding with iWeb
- » Embedding with Adobe Muse
- » Troubleshooting Pathing Problems
- » Expand Gallery Behavior
- Frequently Asked Questions
- Upgrading Juicebox
- Version History
- Sharing, SEO and Shopping Cart
- Multi-Size Image Support
- Password Protection
- Theming Guide
- Using the API
Social Sharing
Juicebox-Pro galleries come with social sharing support built-in for the five most popular social sharing networks:
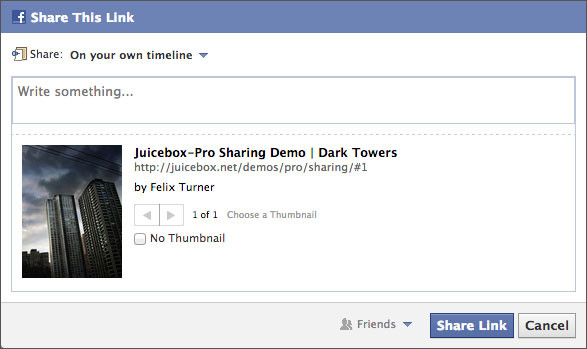
Clicking a share icon brings up a browser popup window to allow sharing of the current image. View Social Sharing Demo.
To enable Social Sharing:
- Use the sharing options to specify which social networks you wish to use.
- Set the 'shareURL' option to be the absolute URL of the page the gallery is embedded in, not including the HTML file name. For example:
http://www.example.com/mygallery/. This URL is used to generate the shared content URLs.
Sharing text, URLs and images are automatically created. Sharing text is a combination of gallery title, image title and image description. Shared links will link back to the specified image in the gallery. Facebook and Google+ will show the thumbnail of the first image in the gallery. Tumblr and Pinterest will show the thumbnail of the currently viewed image. Note that changing the order of images in a gallery may cause existing incoming shared links to point to the wrong image.
JuiceboxBuilder-Pro will also automatically add the appropriate Open Graph tags to the generated HTML page. Open Graph tags are used by Facebook and Google Plus to display the correct content for shared links.
Search Engine Optimization (SEO)
JuiceboxBuilder-Pro will automatically add Search Engine indexible content to a gallery's generated HTML page. This allows gallery titles, captions and images to show up in search engine queries bringing more visitors to your site.
To enable this feature, check the 'Add SEO Content' option in JuiceboxBuilder-Pro.
Juicebox uses the following data to build the SEO content. To maximise SEO visibility, ensure the following fields are not blank:
- Image Titles
- Image Captions
- 'galleryTitle', 'galleryDescription' and 'shareUrl' options
Gallery title and description are also used to generate the HTML page's title and description tags, both of which are important for SEO purposes.
SEO content is added as HTML text and images inside a <noscript> tag. This content will also show on devices that do not support JavaScript. This content is not loaded by JS enabled devices which means it will not interfere with gallery smart preloading.
To view an example of generated SEO Content, view this demo and do a 'View Source'. For an example of Juicebox SEO in action, do a Google search for "felix turner dark towers". The first result in web search and image search is the Juicebox-Pro Sharing Demo and corresponding image.
Note that it can take days or weeks for Search Engines to pick up new content on the web. In addition, you need incoming links to your gallery pages for Search Engine crawlers to be able to find them. You can manually request Google re-index your site by doing the following:
- Go to Google Webmaster Tools
- If your site is not listed, do 'Add a Site'
- Go to 'Health' -> 'Fetch as Google'
- Click 'Fetch' to re-index your entire site, or add specific gallery URLs
Shopping Cart
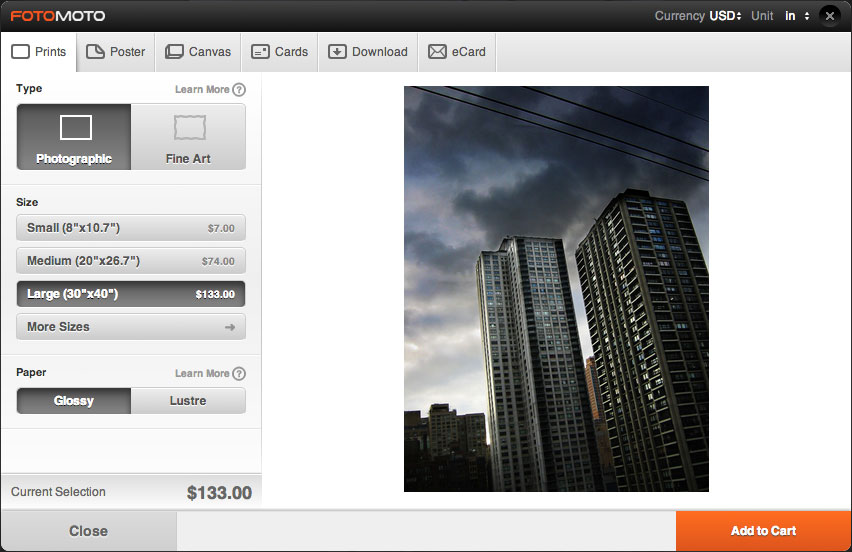
Juicebox has teamed up with Fotomoto to support selling images using a seamless shopping cart built into the gallery. Alternatively you can use custom purchase URLs to link to other ecommerce solutions.
Using FotoMoto
Fotomoto is an e-commerce solution for handling credit card processing, printing and shipping of digital images. Fotomoto is a free service that collects a 22% transaction fee on each sale. There are also paid plans with reduced transaction fees.
To see the shopping cart in action, view this demo and click the shopping cart icon.
To sell your images using Juicebox-Pro and Fotomoto, do the following:
- Sign up for a free Fotomoto account, select your account type, and link your payment method to your Fotomoto account to allow deposits to your account.
- Use the Fotomoto Wizard to set up your store, select the products you want to sell and the prices you want to sell them at.
- Get your Fotomoto Store Id. To do this, log-in to Fotomoto, and go to: Dashboard -> Settings -> Store Settings -> Store Information -> Store ID.
- In your Juicebox Pro settings, set 'fotomotoStoreId' to the Id from the previous step.
- Upload gallery to your website and test out the shopping cart. Adjust image prices as required.
Additional notes:
- When an image is purchased, Fotomoto will email you and request a high resolution version of the image be uploaded for printing.
- Shopping Cart button is disabled in Small Screen Mode since the Fotomoto popup interface does not fit on smaller screens.
- Shopping Cart button is disabled when the gallery is loaded into an iframe.
- In order to test a Shopping Cart, the Juicebox gallery must be served from a web server. Shopping Cart will not work locally or within JuiceboxBuilder.
- To move the position of the Fotomoto checkout button, go to Fotomoto Dashboard -> Settings -> Store Appearance -> Shopping Cart Appearance -> Style and Layout -> Position.
- Shopping Cart does not support Flickr Galleries.
Using Custom Purchase URLs
Juicebox-Pro supports adding a custom purchase URL for each image in the gallery. Adding a purchase URL for an image will cause the shopping cart icon to show in the button bar for that image. Clicking the shopping cart icon will open the specified purchase URL in a new tab. To determine purchase URLs please check your e-commerce solution documentation. To add custom purchase urls to your gallery:
- Build your gallery as normal.
- Open the generated
config.xmlin any text editing software (e.g. Notepad, TextEdit). For each image tag in the document, add apurchaseURLattribute. For example:<image imageURL="images/tall.jpg"
thumbURL="thumbs/tall.jpg"
purchaseURL="http://www.my-purchase-url.com">
<title>This is my title.</title>
<caption>This is my caption.</caption>
</image> - Save config file and upload gallery as normal.